This post describes a certificate-enrollment pattern for domain-joined Linux workstations that need to authenticate with machine-account Kerberos and request workstation certificates from Microsoft AD CS. The main moving parts are CES/CEP, Kerberos delegation, certificate templates, Linux domain join and keytab handling, and client-side enrollment tooling.
We will cover the detail a little further down, but at a high level this can be achieved with:
- CES/CEP configured on the Microsoft CA (or on separate machines as a CA role)
- Domain join and keytab configuration on Linux workstations.
- CEPCES open source project: https://github.com/openSUSE/cepces/
The lab configuration I’d suggest you start your POC with:
- Windows 2019 Domain Controller.
- Windows 2019 Certificate Authority configured in Enterprise mode.
- Linux client - This post is based on Debian.
- Windows client - Domain joined, but logged on with local account. This will help confirm that CEP/CES is doing it is thing before you start trying to teach a linux client to enjoy Windows things.
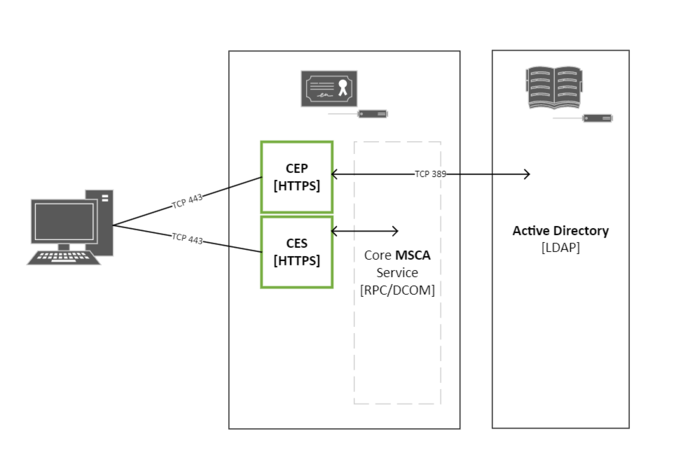
CES/CEP in brief
CES and CEP provide a HTTPS interface for your CA. It is different than the old web enrollment interface that it sometimes gets confused with. Unlike that web enrollment interface, there is no web GUI to click through and manually request certificates.
Instead, CEP basically provides a HTTPS to LDAP interface to retrieve information about available certificates from AD and CES provides a HTTPS to RPC/DCOM interface to allow clients to retrieve those certificates from the certificate authority.
The HTTPS interface is especially useful for the use case at the top of this post because we can enforce Kerberos authentication.
This diagram might help, but I’d caution that in many cases it will be preferable to move the role onto it is own server.
CES/CEP Installation
Installation of CES and CEP is relatively easy and your best bet is to stick with the Microsoft documentation in case there are adjustments in the UI and this post is out of date.
I’d recommend this page:
The Microsoft article can be summarized as:
- Install the CES and CEP roles using Add/Remove Roles in Windows Server.
- Configure the roles via the Wizard.
- Choose Integrated Windows Authentication. (Our goal is for Kerberos authentication via linux machine account)
- You’ll need a Server certificate available for the Wizard to configure on the HTTPS interface.
- You’ll need a service account for the CES/CEP service and that service account needs to be added to the IIS_USER group on the CESCEP server.
Once it is set up, you’ll need to make sure that the service account has a HTTP SPN and that it is trusted for delegation that is constrained to the MSCA.
In case it is helpful here is my configuration with those things:
- Domain: jmpesp.xyz
- Service account: jmpesp\cescep
- CA: ca.jmpesp.xyz
- DC: dc.jmpesp.xyz
Delegation example (PowerShell):
Get-ADUser -Identity cescep | Set-ADAccountControl -TrustedToAuthForDelegation $True
Set-ADUser -Identity cescep -Add @{'msDS-AllowedToDelegateTo'=@('HOST/CA.jmpesp.xyz','RPCSS/CA.jmpesp.xyz')}
SPN Example:
setspn -s http/ca.jmpesp.xyz jmpesp\cescep

setspn can be confusing, but the command above is saying “when someone comes looking for a service ticket for HTTP on ca.jmpesp.xyz the AD account needed is cescep.jmpesp.xyz - our service account. So without this SPN, what could happen is that a client might just fail, because there is no HTTP SPN. Or it might fall back to ask for HOST\ca.jmpesp.xyz which will be no good, because the secret in play there would be the computer account for the CA rather than our new service account that it running the service.
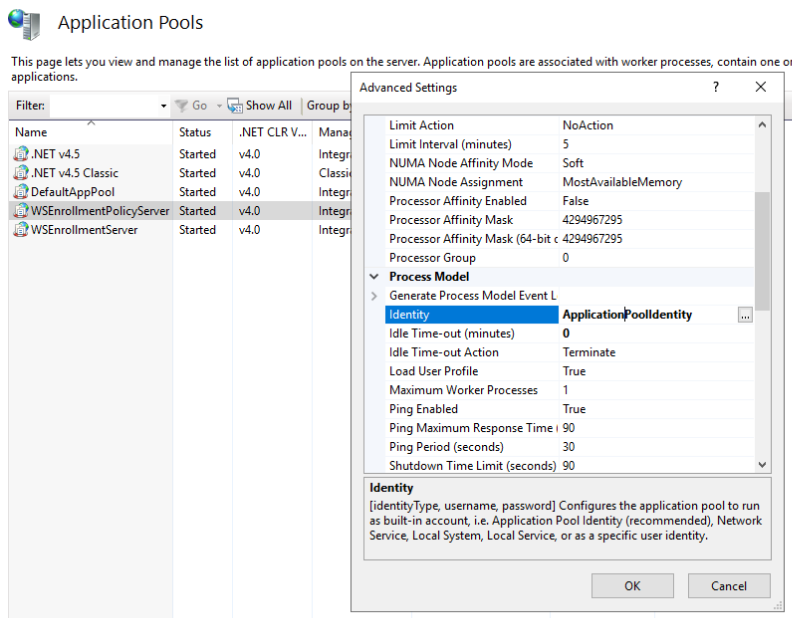
Potential Problem
There’s one more thing that caught me, it is worth leaving a note here:
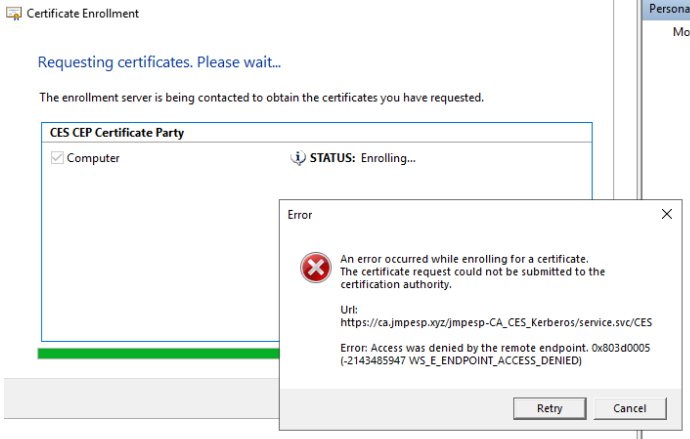
"Error: Access was denied by the remote endpoint"
The answer was provided in this post: https://msitpros.com/?p=1930 .
But to summarize:
- Make sure that both application pools for CES/CEP have been configured to run as the service account from above (in IIS manager). You’ll probably find that one is running as “ApplicationPoolIdentity”.
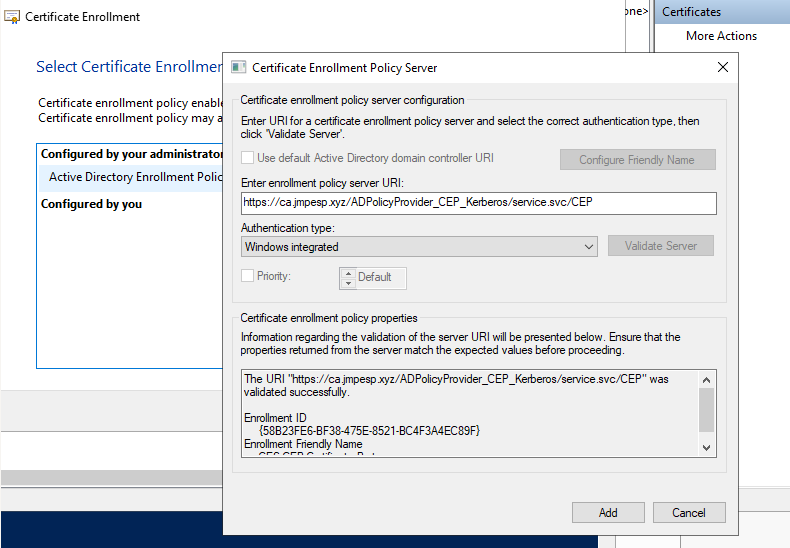
Once you’ve nailed that I’d suggest you test this on a domain joined Windows machine before moving forward. Log in with a local admin account rather than a domain account so that you know the only Kerberos going on is via the computer ticket.
- Open a mmc.msc window.
- Choose Certificates from the file -> add/remove snap in interface.
- Choose computer certificates.
- Go to the personal store.
- Request new certificate.
- Just behind the dialog below there is a little link under “configured by you” on the right. It is the one that will let you add a CES/CEP interface.
- Provide the CES/CEP path. It is always in the format shown, but if you are unsure go back to IIS Manager on the CEP/CES server, choose Default WebSite, ADPolicyProvider_CEP_kerberos, and then application settings. You can grab the “URI” value from there.
Once you’re satisfied the test Windows client is working, you can move on to Linux where things are much more interesting :)
Linux Client Configuration.
DNS:
Hostname should be FQDN for the domain:
sudo hostnamectl set-hostname pop-os.jmpesp.xyz
Not essential, actually, maybe not even recommended, but worked for me - to ensure nothing fancy is going on with DNS you can do:
sudo systemctl disable systemd-resolved
sudo systemctl stop systemd-resolved
sudo nano /etc/resolv.conf
then add the nameserver you’d like to use for this process to the file and save it:
nameserver 192.168.1.165
Domain Join:
sudo apt -y install realmd libnss-sss libpam-sss sssd sssd-tools adcli samba-common-bin oddjob oddjob-mkhomedir packagekit
Test that you can now “see” the domain you’d like to join:
sudo realm discover jmpesp.xyz
Join:
sudo realm join -v -U Administrator jmpesp.xyz
(Doesn’t have to be administrator, just someone that can join the domain. You don’t need any jmpesp\administrator type format; if the previous steps have worked, you are golden)

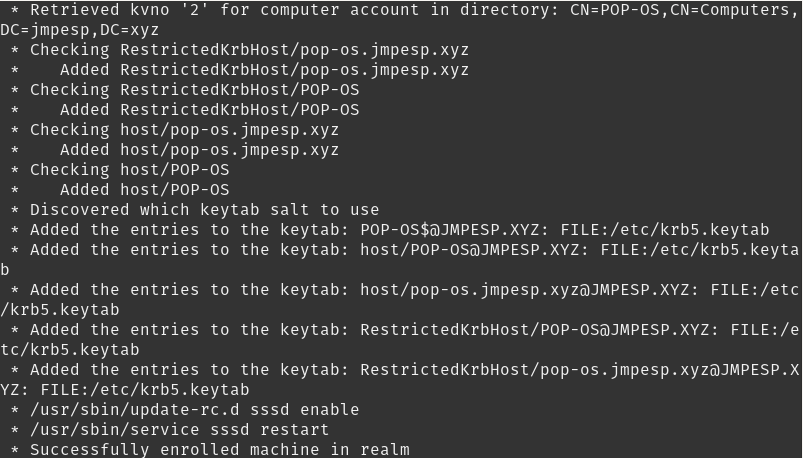
If things have gone well, you’ll get a successful response from:
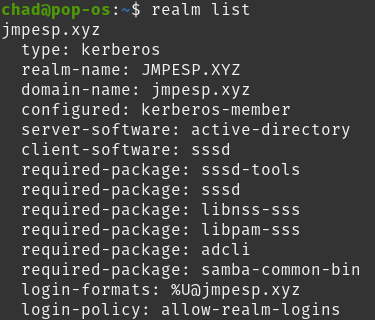
realm list
Kerberos:
apt-get install sssd heimdal-clients msktutil
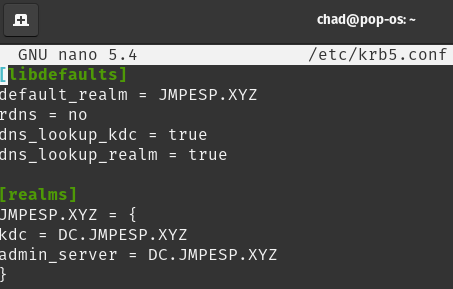
Then, configure your /etc/krb5.conf.
For example:
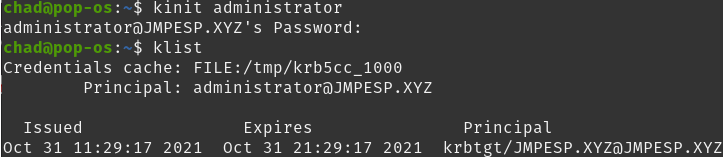
If things are on track, you’ll be able to kinit and get a Kerberos ticket for the user. I’m using “administrator” for a simple lab example, but you should be able to use others from the domain.
kinit administrator
Good progress, but for the computer to talk Kerberos with our CESCEP server we are going to need a krbtgt for the computer account.
We can test that with:
sudo kinit -kt /etc/krb5.keytab POP-OS\$@JMPESP.XYZ
sudo klist
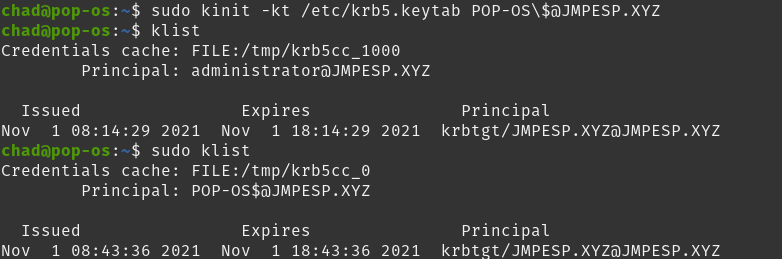
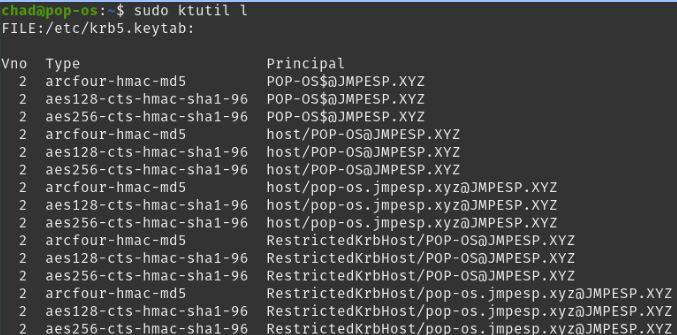
The critical part when it comes to the CEP/CES library we’ll configure in a minute is that your keytab file is in good shape. You can test with:
sudo ktutil -l
Update our /etc/sssd/sssd.conf:
sudo cp /etc/krb5.keytab /etc/sssd/key.keytab
sudo nano /etc/sssd/sssd.conf
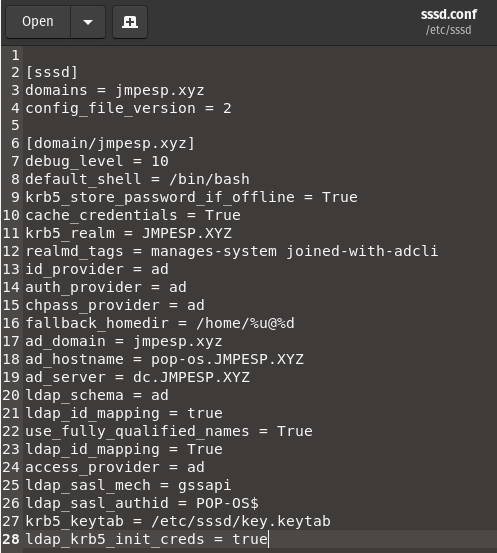
sudo chmod 600 /etc/sssd/sssd.conf
We’re ready to ask for certificates.
Certificates:
git clone https://github.com/openSUSE/cepces.git
sudo apt install libkrb5-dev
sudo apt install python3-pip
cd cepces
sudo pip3 install -r requirements.txt
Then
sudo apt install certmonger
sudo apt install python3-requests-Kerberos
sudo python3 setup.py install
I had trouble with older versions of certmonger. The one that worked reliably for me was 0.79.13-3. On older ubuntu versions I had to pin the sources for this package to get it to update from a later release. You can inspect the versions available/installed like: sudo apt-cache policy certmonger
Edit the certmonger config with your environment details:
sudo cp /usr/local/etc/cepces/cepces.conf.dist /usr/local/etc/cepces/cepces.conf
sudo nano /usr/local/etc/cepces/cepces.conf
My working example is:
[global]
# Hostname of the issuing certification authority. This is an optional setting
# and is only used to construct the URL to the Policy Provider endpoint.
#
# Default: ca
server=ca.jmpesp.xyz

# This is the endpoint type. It can be either "Policy" where the server
# endpoint specified later will be used to look up enrollment endpoints, or it
# can be "Enrollment" to specify a direct endpoint (bypassing XCEP
# altogether.)
type=Policy

# This is the authentication mechanism used for connecting to the service
# endpoint. The following options are available:
#
# * Anonymous
#             Anonymous authentication (i.e. no authentication at all.) This
#             is discouraged and untested. It is only included for completness
#             as defined in the MS-XCEP specification.
# * Kerberos
#             Transport level authentication. This is the default where the
#             authentication is performed in the HTTP(s) layer.
# * UsernamePassword
#             Message level authentication. The credentials are used in the
#             message header for authentication.
# * Certificate
#             Message level authentication. A client certificate is used to
#             sign the message. This is not yet implemented.
#
# Default: Kerberos
auth=Kerberos

# This is the final URL of the Policy Provider endpoint.
#
# Default: https://${server}/ADPolicyProvider_CEP_${auth}/service.svc/CEP
endpoint=https://${server}/ADPolicyProvider_CEP_${auth}/service.svc/CEP

# Path to a CA bundle or directory containing certificates. If not specified,
# the system default is used. If set to an empty value, verification is
# bypassed. This is strongly discouraged.
#
# Please note that directories are supported starting with python-requests 2.9.
#
# Default: <not defined>
#cas=

[Kerberos]
# Use the specified keytab. If unspecified, the system default is used.
#
# Default: <not defined>
#keytab=

# An optional explicit realm to use. If unspecified, the default system realm
# is used.
#
# Default: <not defined>
realm=JMPESP.XYZ

# Initialize a credential cache. If this is disabled, a valid credential cache
# is required prior launching the application. If enabled, a temporary
# in-memory cache is created, and released when the application ends.
#
# Default: True
ccache=True

# A list of principals to try when requesting a ticket.
#
# Default: <empty list>
principals=
  ${shortname}$$
  ${SHORTNAME}$$
  host/${SHORTNAME}
  host/${fqdn}

# A list of encryption types to use.
#
# Default: <not defined>
enctypes=
  aes128-cts-hmac-sha1-96
  aes256-cts-hmac-sha1-96
You need to add a “CA” (configuration) so that certmonger knows how to deal with the CESCEP interface on the Certificate Authority.
sudo getcert add-ca -c cescep-ca -e '/usr/local/libexec/certmonger/cepces-submit --server=ca.jmpesp.xyz --keytab=/etc/krb5.keytab'
The important parts from that command:
- -c is going to be the name you use as your CA to request certificates going forward.
- -e is pointing to the script that certmonger should use to get the CESCEP job done. It is the github package we downloaded and installed above. There’s a chance, depending on your distribution that it is not in that location. Use something like
find / -name cepces-submitto be sure. - –keytab is how the Kerberos magic is going to work using the machine credentials. The ktutil command a little further back in this post can help if you think you have keytab issues.
The github instructions will advise you to use a –principal parameter in the CA configuration. I hit a wall with that. No matter what I did, the debug logs showed me a parser error. Instead, you can configure the principal part of this in the cepces config. My config was in /usr/local/etc/cepces/cepces.conf but it will vary slightly by distro (find / -name cepces.conf).
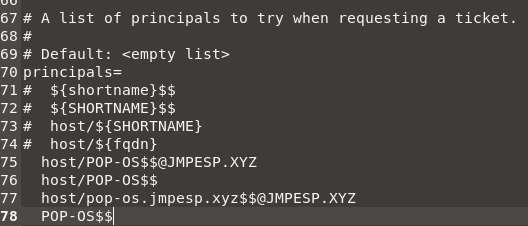
The double $ characters are important, it makes the parser handle computer SAM account names properly as an escape character. They would otherwise look like pop-os$ but that’s be interpreted wrong. To be clear though, you don’t need this change. The parser should work. But this reliably got me past the parser errors I was hitting on a default PopOS! install.
Trust the CA:
We kind of skipped a step, otherwise we’d be ready to roll.
We need to trust the TLS certificate that the CA is going to send us when we try to use CESCEP.
The easiest way I know to get the certificate chain for your CA trusted on the linux client is just to export it using firefox. If you just navigate to the CA on https://ca.jmpesp.xyz you’ll hit that default IIS page. If you’ve hit “ok, I trust the certificate warning” you should be able to get there despite the currently untrusted certificate. If you click on the certificate information in the browser you can navigate through and “download PEM chain” (Here’s an example post: https://www.shellhacks.com/get-ssl-certificate-from-server-site-url-export-download/).
Once you have the .pem file, copy it to /etc/ssl/certs and run
sudo update-ca-certificates --fresh --verbose
Request a certificate:
We should now be able to do:
sudo getcert request -c cescep-ca -w -v -M 644 -T Machine -I Computer -k computer.key -f computer.crt
You don’t need to pre-create the keys or a CSR, certmonger has your back. It knows how to work with CESCEP via the -c parameter which is what we configured a couple of steps back.
If everything worked, you’ll have a brand new certificate signed by your Microsoft CA. The CA was happy to give it up because of Kerberos authentication.
try:
openssl x509 -in computer.crt -text -noout
to inspect it.
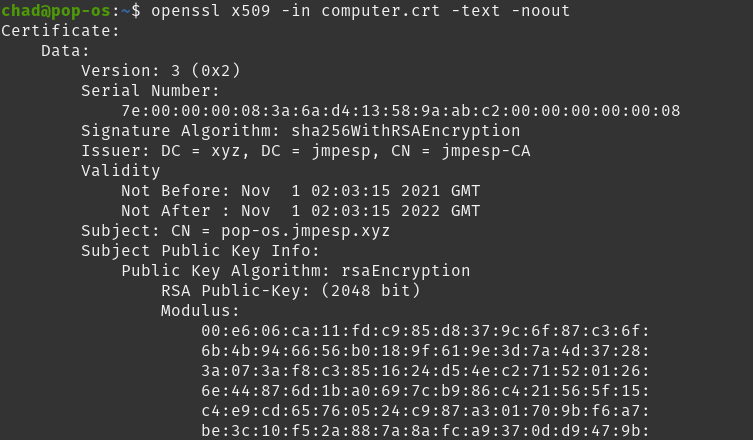
You can also look in the Certification Authority manager console on the CA. You should see the linux computer certificate issued (certificate 8 in the screenshot).

Troubleshooting:
I had to fumble through all of the above. The commands in this section are useful things I found along the way:
If you think the keytab might not be doing what you need, mskutil can help out with a command that is very similar to the windows nltest secure channel command:
sudo msktutil update --dont-change-password --server dc.jmpesp.xyz --computer-name pop-os --no-reverse-lookups
To list current certificate requests being managed by certmonger (after trying a request):
sudo getcert list
Delete a request if things look crook:
sudo getcert stop-tracking -i Computer
(where -i is the tracking name we supplied in the getcert request command. it’ll be shown in getcert list)
More useful troubleshooting information if a getcert request is not successful:
sudo journalctl -xe -t certmonger | tail
If this log is empty for you it is possible to edit /lib/systemd/system/certmonger.service. There is a line ExecStart=/usr/sbin/certmonger -S -p /run/certmonger.pid -n $OPTS that is looking for a variables file. You’d usually put your logging options in that file, but if you don’t want to mess around working that out you can just do something like ExecStart=/usr/sbin/certmonger -S -p /run/certmonger.pid -n 15
Inspect the “CA” configuration:
sudo getcert list-cas
Remove a “CA” configuration if you think you’ve stuffed it up, or changed the configuration:
sudo getcert remove-ca -c cepces-ca
You can also use the IIS logs. The image below shows the failing CEPCES requests (python requests library) and a Windows client for comparison:
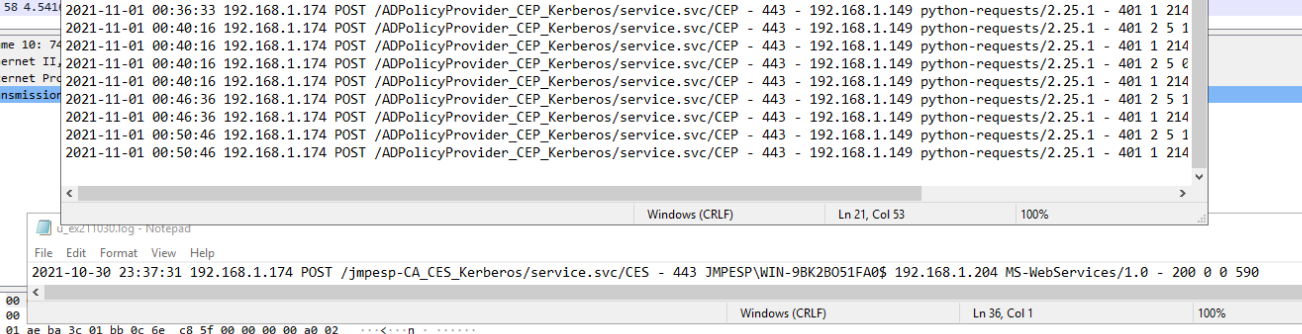
^ for what it is worth, this part of the log was when I had trouble with my computer keytab configuration.
Also recommended: Wireshark on the CA while working out your POC. It is hard to tell on the client side whether certmonger reached out to the CA at all. If you’re stuck, wireshark is really useful to see if the process is progressing that far.
Last Note:
Obviously most of the work above should be rolled into the configuration script for the computer. It wouldn’t be sustainable to do it on each machine manually. If you move this beyond a lab, treat the script as part of endpoint provisioning and include checks for time sync, DNS, keytab health, CA trust, and certificate renewal state.