azure
Infrastructure Notes - Azure site-to-site VPN
Extending the on-site lab network to an Azure VNet. The tunnel was the easy part; working out why traffic only passed in one direction took a little longer.
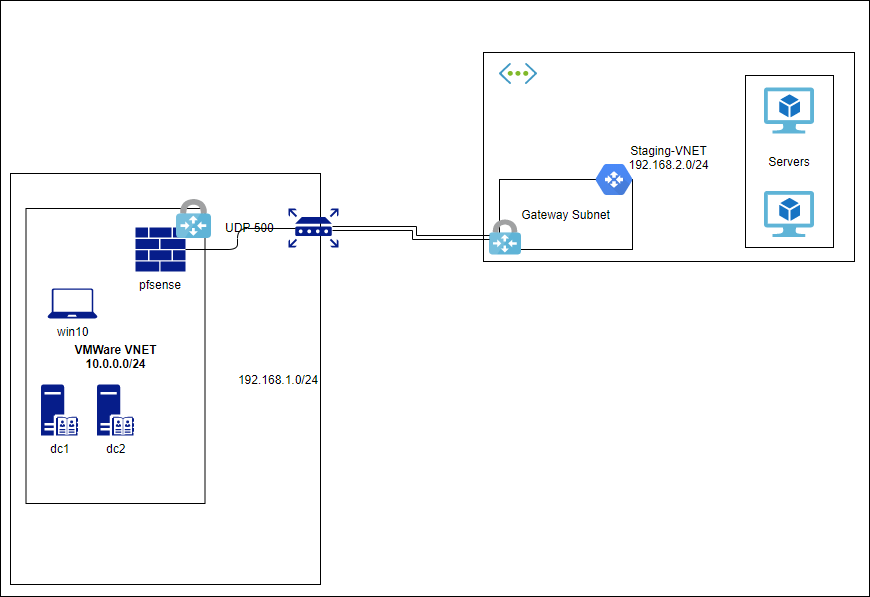
VMWare Lab Network: 10.0.0.0/24
New Azure VNET: IP Range: 192.168.2.0/24
New Server Subnet: IP Range: 192.168.2.0/26
After creating the new Azure VNET:
1 - Add a Gateway Subnet
- Select the Network, then Subnets in Azure portal.
- Click “Gateway Subnet”
- Original lab address range: 192.168.2.240/28 (11 usable IPs after Azure’s five reserved addresses).
For a new deployment, use a /27 or larger address block for GatewaySubnet (for example 192.168.2.224/27 in this VNet). The old /28 isn’t suitable for all current gateway SKUs. Gateway subnet requirements.
2 - Update DNS for VNET clients
- Since they’ll want to join the on-prem AD
- Click on the new virtual network, then DNS Servers
- Add the on-prem DNS server addresses
3 - Create Virtual Network Gateway
- Go back to the resource group level
- Click Add
- Search for Virtual Network Gateway (click create)
- Gateway Type is VPN for this adventure
- VPN type is ‘route based’
- Select the virtual network it will connect
- Select the gateway subnet we just created
- Click create - it’ll warn, but this can take 15 - 45 minutes.
Before creating the gateway, decide whether you need route-based VPN, policy-based VPN, BGP, active-active tunnels, or zone-redundant gateways. Route-based is the normal answer for most modern designs, but the device on the other end needs to agree on IKE/IPsec settings.
4 - Create Local Network Gateway Object
- You need an object that Azure will reference as the other side of the VPN tunnel.
- Go back to the resource group level
- Click Add
- Search for Local network gateway (click create)
- Name: something that makes it obvious what this object is for
- IP address: your edge router (firewall) IP address
- Address space: the internal subnets on the other site that Azure will build as routes.
- Location: same location as before
5 - Create site-to-site VPN
- Click on the virtual gateway that was created in part 3
- Choose connections - Add connection
- Choose ‘site to site ipsec’
- Configure a pre shared key
6 - Connect it up.
- Make sure the IPsec traffic is being forwarded through to the VMware gateway.
- Locate the IP address of the gateway (it’ll be needed by the firewall on the other side)
- Create a new site-to-site IPsec tunnel
- Create a new route for the Azure network on the other side of the tunnel
- Configure firewall exceptions on the gateway.
The routes matter as much as the tunnel. Validate both directions: Azure subnet route tables, local network gateway address spaces, on-prem firewall routes, NAT exemptions, and whether either side is accidentally translating traffic that should stay private.
7 - What went wrong?
- Azure to on-prem traffic was being filtered on the pfSense firewall.
- (Other direction is fine, ping, SMB etc, all good)
- pfSense has built in packet capture that showed the packets arriving
18:04:17.666589 (authentic,confidential): SPI 0xc5e2e529: IP 192.168.2.4 > 10.0.0.100: ICMP echo request, id 1, seq 625, length 40 - Hair pulling out
- Block bogon networks - once unchecked on the WAN interface in pfSense, no more dropping packets. Solved (but not yet understood).
That was the observed workaround, but the packet capture alone doesn’t establish why the rule matched. pfSense has separate settings for blocking private networks and blocking bogons; treating them as the same thing would be a bad explanation. Netgate documents the distinction here.
To close that out properly, check the firewall log for the blocked packet and identify the rule, interface and source address it matched. For a VPN, also distinguish the outer packet between gateways from the decrypted packet between the private hosts. “Tunnel connected” only tells us the gateways negotiated successfully; routes and filtering can still stop the actual traffic.