This note covers extending an on-premises lab network into an Azure virtual network with a site-to-site VPN. The core design work is address planning, gateway selection, routing, shared-key handling, and proving that traffic follows the intended path in both directions.
2026 context: this is still a reasonable lab walkthrough, but for production you should start with Microsoft’s current VPN Gateway design guidance and site-to-site tutorial. Pay close attention to gateway SKU, active-active requirements, zone redundancy, BGP, supported IPsec/IKE parameters, and whether ExpressRoute or Virtual WAN is a better fit.
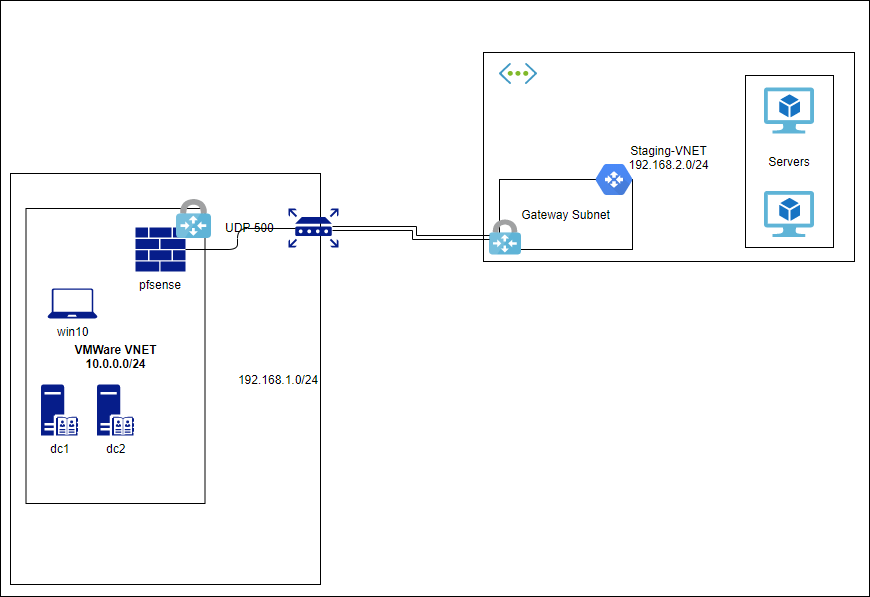
VMWare Lab Network: 10.0.0.0/24
New Azure VNET: IP Range: 192.168.2.0/24
New Server Subnet: IP Range: 192.168.2.0/26
After creating the new Azure VNET:
1 - Add a Gateway Subnet
- Select the Network, then Subnets in Azure portal.
- Click “Gateway Subnet”
- Address range: 192.168.2.240/28 (11 IPs + the 5 Azure reserved addresses)
For new designs, use a larger GatewaySubnet than the absolute minimum where possible. It gives you more room for future gateway changes and avoids annoying rebuilds later.
2 - Update DNS for VNET clients
- Since they’ll want to join the on-prem AD
- Click on the new virtual network, then DNS Servers
- Add the on-prem DNS server addresses
3 - Create Virtual Network Gateway
- Go back to the resource group level
- Click Add
- Search for Virtual Network Gateway (click create)
- Gateway Type is VPN for this adventure
- VPN type is ‘route based’
- Select the virtual network it will connect
- Select the gateway subnet we just created
- Click create - it’ll warn, but this can take 15 - 45 minutes.
Before creating the gateway, decide whether you need route-based VPN, policy-based VPN, BGP, active-active tunnels, or zone-redundant gateways. Route-based is the normal answer for most modern designs, but the device on the other end needs to agree on IKE/IPsec settings.
4 - Create Local Network Gateway Object
- You need an object that Azure will reference as the other side of the VPN tunnel.
- Go back to the resource group level
- Click Add
- Search for Local network gateway (click create)
- Name: something that makes it obvious what this object is for
- IP address: your edge router (firewall) IP address
- Address space: the internal subnets on the other site that Azure will build as routes.
- Location: same location as before
5 - Create site-to-site VPN
- Click on the virtual gateway that was created in part 3
- Choose connections - Add connection
- Choose ‘site to site ipsec’
- Configure a pre shared key
6 - Connect it up.
- Make sure the IPsec traffic is being forwarded through to the VMware gateway.
- Locate the IP address of the gateway (it’ll be needed by the firewall on the other side)
- Create a new site-to-site IPsec tunnel
- Create a new route for the Azure network on the other side of the tunnel
- Configure firewall exceptions on the gateway.
The routes matter as much as the tunnel. Validate both directions: Azure subnet route tables, local network gateway address spaces, on-prem firewall routes, NAT exemptions, and whether either side is accidentally translating traffic that should stay private.
7 - What went wrong?
- Azure to on-prem traffic was being filtered on the pfSense firewall.
- (Other direction is fine, ping, SMB etc, all good)
- pfSense has built in packet capture that showed the packets arriving
18:04:17.666589 (authentic,confidential): SPI 0xc5e2e529: IP 192.168.2.4 > 10.0.0.100: ICMP echo request, id 1, seq 625, length 40 - Hair pulling out
- Block bogon networks - once unchecked on the WAN interface in pfSense, no more dropping packets. Solved (but not yet understood).
The lesson there is not “turn off useful firewall checks everywhere”; it is that lab VPNs often use RFC1918 ranges on interfaces that firewall products may classify as impossible Internet traffic. If a tunnel comes up but one direction fails, packet capture on both ends is usually faster than staring angrily at the Azure portal until it confesses.