This note captures the practical setup required to use a YubiHSM 2 for low-volume code signing. The device is well suited to lab and small-team workflows where the priority is protecting signing keys without introducing a large enterprise HSM platform.
Summary
- Plug in the YubiHSM
- Install the YubiHSM software
- Use the template provided by YubiCo to produce an inf file.
- Create a CSR using the .inf as input.
- Take the CSR to a Certificate Authority and generate a new certificate
- Install the issued certificate in the certificate store on the signing machine
- Sign things.
The Notes
For Step 1 and 2: Plug in the YubiHSM, Install the YubiHSM software
You’ll need to download the appropriate package for your operating system. For Windows that package is here.
Once you’ve done that install both the CNG and the Connector, they are contained in the zip.
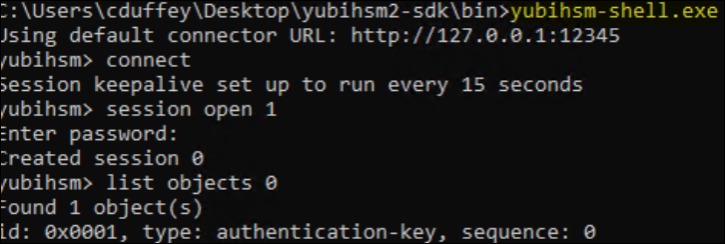
You can test that things are looking rosy by navigating to the directory that you unpacked the YubiHSM SDK and navigating to the bin folder. There’s a tool in there called yubihsm-shell.exe that will allow you to make your first interaction with the device.
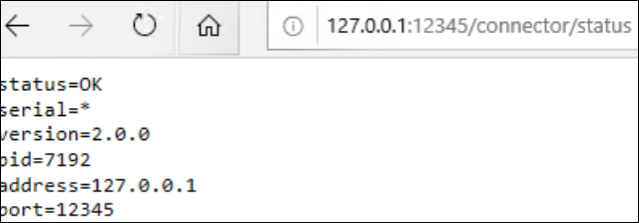
You’ll also notice that a status page for the HSM connector is available at http://localhost:12345/connector/status on the machine.
For Step 3: Use the template provided by YubiCo to produce an inf file describing the signing certificate you need.
Download the sample template provided by YubiCo here
Chances are, you don’t need to modify much in the template. For me, just the Subject. But check with your Certification Authority folks if you believe you have some additional things in your CSR.
[Version]
Signature="$Windows NT$"

[NewRequest]
Subject = "CN=DropbearSec" ; Entity name (dns name/upn for other cert types)
Exportable = FALSE ; Private key is not exportable
KeyLength = 2048 ; YubiHSM KSP key sizes: 2048, 3072, 4096
KeySpec = 2 ; 1 = AT_KEYEXCHANGE, 2 = AT_SIGNATURE
KeyUsage = 0x80 ; 80 = Digital Signature, 20 = Key Encipherment (bitmask)
MachineKeySet = False ; True: cert belongs the local computer, False: current user
ProviderName = "YubiHSM Key Storage Provider"
ProviderType = 1
SMIME = FALSE
RequestType = CMC ; Can be CMC, PKCS10, PKCS7 or Cert (self-signed)

[Strings]
szOID_ENHANCED_KEY_USAGE = "2.5.29.37"
szOID_CODE_SIGN = "1.3.6.1.5.5.7.3.3"
szOID_BASIC_CONSTRAINTS = "2.5.29.19"

[Extensions]
%szOID_ENHANCED_KEY_USAGE% = "{text}%szOID_CODE_SIGN%"
%szOID_BASIC_CONSTRAINTS% = "{text}ca=0&pathlength=0"

; If you are using ADCS with certificate templates, you may add
; a specific template under [RequestAttributes]
;[RequestAttributes]
;CertificateTemplate= CodeSigning
The important part in that request template is the ProviderName = "YubiHSM Key Storage Provider". In the next step the certificate request will be generated using that CNG provider (saying, please refer to the YubiHSM for the private key material)
For Step 4: Create a CSR using the .inf as input.
You can use:
certreq -new sign.inf sign.req
You should see:
CertReq: Request Created
You can also look on the YubiHSM and notice that you have a new object:

Feel free to inspect the CSR one last time before submitting it:
c:\tmp>type sign.inf

[Version]
Signature="$Windows NT$"

[NewRequest]
Subject = "CN=DropBearSec" ; Entity name (dns name/upn for other cert types)
Exportable = FALSE ; Private key is not exportable
KeyLength = 2048 ; YubiHSM KSP key sizes: 2048, 3072, 4096
KeySpec = 2 ; 1 = AT_KEYEXCHANGE, 2 = AT_SIGNATURE
KeyUsage = 0x80 ; 80 = Digital Signature, 20 = Key Encipherment (bitmask)
MachineKeySet = False ; True: cert belongs the local computer, False: current user
ProviderName = "YubiHSM Key Storage Provider"
ProviderType = 1
SMIME = FALSE
RequestType = CMC ; Can be CMC, PKCS10, PKCS7 or Cert (self-signed)

[Strings]
szOID_ENHANCED_KEY_USAGE = "2.5.29.37"
szOID_CODE_SIGN = "1.3.6.1.5.5.7.3.3"
szOID_BASIC_CONSTRAINTS = "2.5.29.19"

[Extensions]
%szOID_ENHANCED_KEY_USAGE% = "{text}%szOID_CODE_SIGN%"
%szOID_BASIC_CONSTRAINTS% = "{text}ca=0&pathlength=0"

; If you are using ADCS with certificate templates, you may add
; a specific template under [RequestAttributes]
;[RequestAttributes]
;CertificateTemplate= CodeSigning
c:\tmp>type sign.req
-----BEGIN NEW CERTIFICATE REQUEST-----
MItxlcwkcvnrmyupnmngfsybeaztrzjzeh
cbuzcudpyzmubxlzfbtqtctxhmpxcygi
ddiqoswveekiplmvqzntfozyhcvwengr
xmtimvwpyisqbwhkuayqictykrtcfozp
lxleyjoptnbvldqqscjywrmsoeisiyufbxlzfbtqtctxhmpxcygi
ddiqoswveekiplmvqzntfozyhcvwengr
xmtimvwpyisqbwhkuayqictykrtcfozp
lxleyjoptnbvldqqstxlcwkcvnrmyupnmngfsybeaztrzjzeh
cbuzcudpyzmubxlzfbtqtctxhmpxcygi
ddiqoswveekiplmvqzntfozyhcvwengr
xmtimvwpyisqbwhkuayqictykrtcfozp
lxleyjoptnbvldqqscjywrmsoeisiyuf082t+QTsUydaZUzfPt6bVOdLRJei83/aFXVHE
tgpk5iq5WqhbsVZYtxlcwkcvnrmyupnmngfsybeaztrzjzeh
cbuzcudpyzmubxlzfbtqtctxhmpxcygi
ddiqoswveekiplmvqzntfozyhcvwengr
xmtimvwpyisqbwhkuayqictykrtcfozp
lxleyjoptnbvldqqscjywrmsoeisiyufE4MDYCAQkMGVNFQS1D
Uy1QT0MtMDEuWU9KT0UubG9jYWwMDVlPSk9FXGNkdWZmZXkMB2NlcnRyZXEwUAYK
KwYBBAGCNw0CAjFCMEACAQAeOABZAHUAYgBpAEgAUwBNACAASwBlAHkAIABTAHQA
bwByAGEAZwBlACAAUABtxlcwkcvnrmyupnmngfsybeaztrzjzeh
cbuzcudpyzmubxlzfbtqtctxhmpxcygi
ddiqoswveekiplmvqzntfozyhcvwengr
xmtimvwpyisqbwhkuayqictykrtcfozp
lxleyjoptnbvldqqscjywrmsoeisiyufJz1pchySTG1qSr3gvz
bXFTRz5QhXyIFgNtxlcwkcvnrmyupnmngfsybeaztrzjzeh
cbuzcudpyzmubxlzfbtqtctxhmpxcygi
ddiqoswveekiplmvqzntfozyhcvwengr
xmtimvwpyisqbwhkuayqictykrtcfozp
lxleyjoptnbvldqqstxlcwkcvnrmyupnmngfsybeaztrzjzeh
cbuzcudpyzmubxlzfbtqtctxhmpxcygi
ddiqoswveekiplmvqzntfozyhcvwengr
xmtimvwpyisqbwhkuayqictykrtcfozp
lxleyjoptnbvldqqscjywrmsoeisiyufFEpYQLp2M0LmLMvFxtOrr+GW7g==
-----END NEW CERTIFICATE REQUEST-----
For Step 5: Take the CSR to a Certificate Authority and generate a new certificate
This is where you upload the CSR to the provider you use. Geotrust, GoDaddy, Verisign, Digicert - whoever you use will be expecting the CSR as part of your request for a code signing certificate.
(It is also possible that your CA is an internal corporate one; this will also apply to you, the difference is that you will log onto the CA and issue a certificate yourself using the CSR as input).
Download the certificate when it is ready.
For Step 6: Install the issued certificate in the certificate store on the signing machine
This is as simple as downloading the certificate from the provider. Downloading to your machine, and importing into the store on that machine. For Windows, you can simply double click the certificate and choose to install. The wizard will select the most appropriate store for you; most likely the personal\my store, although if you are looking to make the certificate available to more folk you’ll want it available in the computer\my store.
The CNG provider that we installed at the start is the thing that is going to make it possible for this certificate to be linked to the private key material on the YubiHSM when we are signing code.
For Step 7: Sign things
Try it out:
You’ll need the Microsoft code signing tools already installed.
You can find them in the Windows 10 SDK. There’s more information about signtool here
signtool sign /v /sm /tr http://timestamp.digicert.com /td SHA1 /fd SHA1 /a /d "DropBearSec Signing Machine" /as c:\tmp\testfile.exe
if you hit issues you can add a debug parameter to show you the certificates that were considered:
c:\Program Files (x86)\Windows Kits\10\bin\x64>signtool sign /v /sm /tr http://timestamp.digicert.com /td SHA1 /fd SHA1 /a /debug /d "DropBearSec" /as c:\tmp\test.exe